I think there's an issue with my storage device, but I'm not sure Start a free evaluation →
I need help getting my data back right now Call now (800) 972-3282
Accidentally deleting files or folders can potentially lead to the loss of valuable data and cause stress to users. Fortunately, there are seven solutions to rescue your files from the clutches of deletion.
Whether you’re a rookie or an advanced Windows user, the diverse array of recovery methods covered in this guide ensures a comprehensive approach to safeguarding and restoring your files in no time.
1. Check your recycle bin
Windows automatically sends deleted files to the recycle bin, providing a safety net before permanent deletion.
Before exploring other options, always start by checking your recycle bin. It’s a quick and simple way to retrieve deleted files, providing a straightforward solution for common accidental deletions.
Steps to check your recycle bin
Difficulty level: Easy
In the digital realm, accidental file deletions can be a source of distress, potentially leading to the loss of valuable data. However, in the ever-evolving landscape of technology, a myriad of solutions exists to rescue your files from the clutches of deletion. In this comprehensive guide for 2024, we delve into seven effective methods to recover deleted files, ranging from the basic to the advanced.
- The Recycle Bin icon is usually located on your desktop. If it’s not visible, you can find it in the File Explorer on the left sidebar.
- Double-click on the Recycle Bin icon to open its contents.
- Inside the Recycle Bin, you’ll see a list of deleted files. You can organize the files by name, type, or data of exclusion to make it easier to find the one you need.
- Scroll through the Recycle Bin and locate the files you want to recover. You can select multiple files by holding down the “Ctrl” key while clicking on them.
- Right-click on the selected files and choose the “Restore” option.
- A confirmation dialog may appear to ensure you want to restore the files. Confirm to return the files to their original locations on your computer.
- Navigate to the original folder or location of the files to confirm that they have been successfully restored.
Pro tip: The Recycle Bin has a storage limit, and older files may be permanently deleted to make room for new ones. Also, large files are usually permanently deleted at the moment, and you may not find them in the recycle bin.
2. Restore from backup
Regularly backing up your files is a crucial practice to easily and quickly restore deleted files. This method ensures you can recover files even if they are permanently deleted from your device.
Restoring from external drive backup
Difficulty level: Easy
- Ensure the external drive containing your backup is connected to your computer.
- Open the backup folder on the external drive.
- Locate the files you want to restore and copy them to a folder on your computer. Alternatively, you can drag and drop them from the external drive to the desired destination.
- Confirm that the files are successfully restored by checking their presence in the chosen folder.
Restoring from cloud backup
Difficulty level: Moderate (requires cloud account and knowledge on how to navigate it)
- Log in to your cloud backup service (e.g., Google Drive, Dropbox, OneDrive).
- Navigate to the folder or location where your files are backed up.
- Select the files you want to recover and either download them directly or use the restore option provided by the cloud service.
- If you’re using a synchronization service, ensure that your cloud files sync with the corresponding local folders.
- Check the local folders on your computer to confirm that the files have been restored.
Pro tip: Ensure that your external drives are regularly updated to capture the most recent versions of your files.
3. Restore from Windows restore points
Windows Restore Points offer a reliable method to undo system changes, including the accidental deletion of files.
Steps to recover deleted files from Windows restore points
Difficulty level: Moderate (requires a minimum level of knowledge)
- Click the Start button and then select Computer.
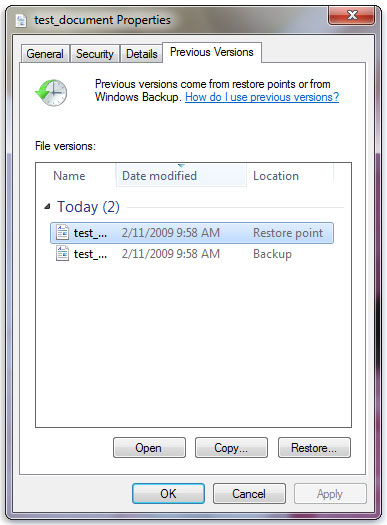
- Go to the folder that used to contain the file or folder, right-click it, and then select Restore previous versions.
- You’ll see a list of available previous versions of the file or folder.
Source: Microsoft support
- Double-click a previous version of the folder that contains the file or folder you want to restore.
- Drag the file or folder that you want to restore to another location, such as your desktop or another folder. The version of the file or folder is saved to the location that you selected.
Warning: The file or folder replaces the current version on your computer, and the replacement can’t be undone.
4. Retrieve deleted files using File History
File History is a built-in backup feature in Windows that automatically backs up versions of your files to an external drive or network location. This continuous backup allows you to retrieve previous versions of files, including those that may have been accidentally deleted.
Warning: You must enable this feature first to create automatic backups.
Recover deleted files using File History on Windows 10
Difficulty level: Easy
With the File History feature enabled and configured, you can use its backup to restore deleted files.
- Go to Settings > Update & Security > Backup and click More Options.
- Scroll down to the bottom of the File History window and click the “Restore files from a current backup” button.
- Double-click the folder you want to restore.
- Select the files you want then click the green button at the bottom of the window to restore them.
Recover deleted files using File History on Windows 11
Difficulty level: Easy
On Windows 11 you can find the File History at the Control Panel. Alternatively, you can open the File History by searching for it in the taskbar search box.
- At the File History window, click the “Restore personal files” link located on the left side.
- Open the folder where the file was saved before the deletion
- Select the files you want to recover and then click the green Restore button.
5. Use the Windows File Recovery tool
For Windows 10 users, the Windows File Recovery tool is a free data recovery solution. This software works as a command-line tool, enabling you to restore deleted files from local drives, external drives, and even SD cards.
Steps to use the Windows File Recovery tool
Difficulty level: Easy
- Download and install the Windows file recovery tool
- Right-click on the Start menu, and select Command Prompt (Admin)
- In the Command Prompt window, enter the command in the following format:
winfr source-drive: destination-drive: [/mode] [/switches]
This tool allows you to decide if you want to restore specific files or folders or every file within the same extension or name.
6. Use Data Recovery Software
When standard methods fall short, data recovery software becomes a beacon of hope for retrieving deleted files.
Data recovery software like SalvageData’s free data recovery tool provides a powerful solution when standard recovery methods fall short.
Steps to use SalvageData free recovery software
Difficulty level: Easy
To use the SalvageData Windows data recovery free tool, first, you must download and install the software.

After that, select the drive you wish to retrieve your files from. Then, click on RECOVER.

Choose the file system and click on SCAN.
Once the scanning process is complete, you can choose from the list which files you want to recover.
Remember that you can’t retrieve overwritten files. Therefore, as soon as you realize your file is missing, stop using your device.
7. Hire a Data Recovery Service
If any of the mentioned methods worked, you should consider contacting a professional data recovery service like SalvageData.
Our computer data recovery experts can evaluate your device and determine what happened. If the data retrieval is possible, then you’ll get it back as soon as you agree with the recovery service.
What is the difference between Windows shadow copies, file history, and restore points?
Windows Shadow Copies, File History, and System Restore Points are different features in Windows, each serving distinct purposes for data protection and system restoration.
Shadow Copies focuses on providing quick access to previous versions of individual files, File History is a dedicated user file backup solution, and System Restore Points are designed to roll back the entire system configuration.
Key differences:
Functionality
- Shadow Copies, also known as Volume Shadow Copy Service (VSS), capture point-in-time snapshots of files and folders. It allows users to access previous versions of files without relying on a dedicated backup solution.
- File History is a backup feature introduced in Windows 8 and later versions. It automatically backs up files in specified folders to an external drive or network location, creating a timeline of file versions for easy recovery.
- System Restore Points focus on creating snapshots of the entire system’s configuration, including system files, registry settings, and installed applications. They are designed to restore the system to a stable state in case of issues.
Scope of Backup
- Shadow Copies: Focus on user files and folders.
- File History: Specifically designed for backing up user files.
- System Restore Points: Capture system configurations and settings.
Backup Location
- Shadow Copies: Stored on the same volume as the original files.
- File History: Requires a different drive or network location for backups.
- System Restore Points: Stored in a hidden system folder on the system drive.
